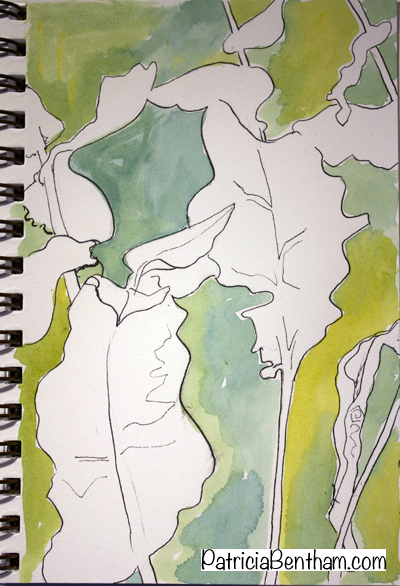
Sketching the negative shapes (the shapes between your subject matter) can be easier than drawing the thing itself. Drawing is an activity that demands that you to be fully present, pay attention, make moment by moment observations of shapes, lines, textures and lighting, and swiftly transfer these impressions on to paper. Learning to sketch the negative speeds up this process.
Since our November weather is chilly, I either sketch outside quickly or take pictures and draw from them later. Our garden is at its end and yet it still motivates me to put pen to paper. In the process of chopping down the dying weeds, flowers and herbs, I noticed the Elecampagne leaves, beautiful even as they wither glowing with vivid crayon box yellows and greens.
Elecampane, also known as Wild Sunflower, grows five feet high and has huge leaves up to a 1 1/2 feet long. When I stare at it, I see the interesting shapes between its leaves that impel me to grab my pen and sketchbook and start recording what I see.
Tips for sketching the Negative
Training yourself to see negative shapes is a great drawing habit to develop as it enables you to draw more spontaneously, with lively results. Observing and sketching the negative shapes bypasses the left side of the brain and the need to, in this case, correctly draw a proper leaf shape. If you struggle with removing the clutter from what you would like to draw and see negative shapes clearly, these tips may help.
1. If your subject matter is close by, place a large white card or piece of foam core (I keep one tucked behind my dining room buffet!) behind your subject matter before you begin to sketch or photograph it. This will help define the shapes between the leaves and cut the visual clutter of the other plants in the background.
The white card makes it easier to see the shapes of the negative spaces, the shapes of the leaves and the definition of the edges between.
2. Another way to train yourself to see negative shapes is by printing out a photo like the one above and then tracing the shapes to get a feel for the structure of the plant and the negative shapes. Then discard the tracing and try again drawing from real life or the photo.
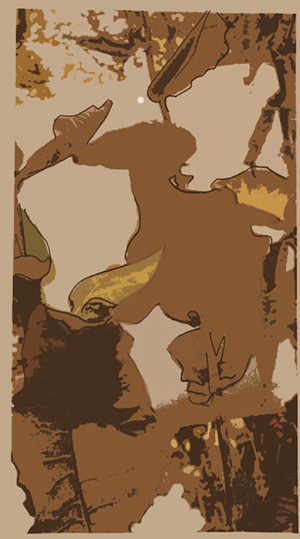
3. If you draw from photos, another technique to help you get in the habit of drawing the negative shapes is to alter the photo. If you have Photoshop or a similar program, play with the image with the “artistic cut out filter” until the negative shapes begin to pop (see image below) or play with the settings on your phone photos editor.
After practicing drawing the negative shapes from the altered photos, it will be easier to observe the negative shapes no matter what your subject matter or whether you are sketching outdoors or from a set up still life.
Creating the sketch
As it was getting too cold to draw after I finished the garden work, I sketched from the photo (see first image above). I concentrated on the negative shapes and added as few details as necessary to suggest the plant.
As the negative shapes were my focus in this sketch, I splashed on a variety of rich greens made from Winsor Blue and Aureolin Yellow that I observed in the real leaves and left the plant white. I may later use the sketch as a reference for a painting. Drawing the negative shapes gives sketches a free flowing movement that I love and that is easy to lose in an overworked botanically correct drawing.
Want more drawing tips?
Sign up for my free ebook and get on the mailing list. I’ll let you know when new content, tutorials and such is on the blog.


